If this is your first visit, be sure to
check out the FAQ by clicking the
link above. You may have to register
before you can post: click the register link above to proceed. To start viewing messages,
select the forum that you want to visit from the selection below.
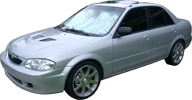
2) create another layer called "outline" and outline the cars with either 7 ot 9 point (holding shift) and click around the car.
3) use 2 and 3 point brushes to outline the doors and lights.
4) create a new layer called "car color" and use the magic wand tool in the "outline" layer to select an area then switch to the "car color" layer (leaving the magic wand area selected) and use the paint bucket to fill any color chosen in to the selcted area.
5) create a new layer called "shadows" and using the polygon lasso tool select areas and paint them in black or shades of grey with the transparency 30%-60% depending on the effect wanted.
6) switch back to the "outline" layer and lower transparency so you can see the rims and the "outline" layer and erase or eliptical tool and delete the area covering just the rims. then change transparency back to 100%
7) keeping the "outline" layer active use the magic wand tool on the head lights and now erased rims. when an area is selected with the wand change to the whie layer and press delete
8) adjust the car color, white, and shadows layers to the desired settings.
9) choose the outline layer and toward the outside of the picture use the magic wand (this will select the car outline and the picture border) Press CTRL+Shift+I so that only the car outline is selcted and choose the option "COPY MERGED".
10) open a new file to whatever size you want you wallpaper to be and paste the cell shaded cars on to it. then create whatever layers or effect you want to make your wallpaper.
It takes me anywhere form 1 1/2 - 3 hours per car depending on how much detail I want to go into.
Originally posted by skr33t_rac3r think u can make a good one with some tight 1st gens
get me a good sized high qulity pic to work with but give me a few weeks. I will be busy on my own projects for a little bit and out of town a bucnh over the next few weeks.


 http://www.revtvguam.com
Comment