to get the MAF screen out you just have to tap one side of it, then the other, and keep alternating till it wiggles free. mine felt a little stuck too but when i tried wiggling it it came out no problem.
-
-
Well, I did the tapping thing.....for several minutes too. I used the end of a wrench that was long and thin enough to fit through without touching anything else. I then went back and forth, side to side, tapping fairly gently at first then a bit harder and nothing. Not even a budge. Maybe it sort of seized up in there over the years (2002 P5 model).
Its irritating since just by looking at it you kind of can tell it slows airflow down, albeit not dramatically IMO.
I may try to tap it out with a small light hammer that might dislodge it better. I still want to do this last mod.Comment
-
I am not very hands on with my car but I am learning what I can about these great little cars. For the life of me I have NO clue where you guys are cutting Not your fault mind you well maybe some of it is. Some pics are not showing up. I need better visuals I guess, can anyone show me please where & what excatly you cut? I have a 2000 Protege ES with a 5 Speed that I'd love to free up some extra power not matter how little starting out.
Thanks in advance.Last edited by norwood1026; 08-24-2009, 08:26 PM.Got Zoom?
2000 Protege ESComment
-
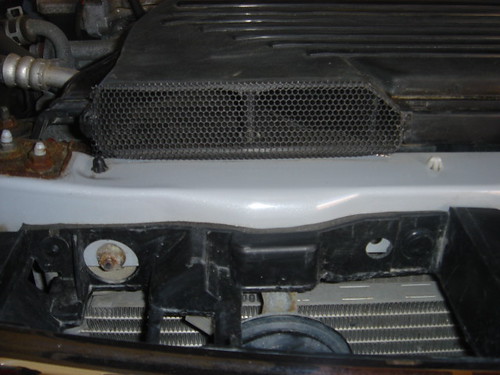
Well, its not so easy to describe with words. Out of the some 200 posts in this thread over the years, there are both very detailed written descriptions of where to cut (first page) as well as numerous pics posted, mixed in random posts. On the other hand, take your car, open the hood, note where the airbox intake opening is (over the rad, left side), close hood slowly and you can figure out that the intake gets basically blocked by the hood. Now figure out where you would cut to open it, obviously not through the hood. The only direction to free up some intake open air is straight down, through some hard black plastic, sort of immediately on the other side of the steel car frame. Hope this helps.Comment
-
Originally posted by LarryP View Post
Thanks I was worried about getting an anwser because the topic goes back some years. I saw one picture where it was showen from the top looking down. I think I understand where I need to cut now I guess I need to remove the grill to do this correct?Got Zoom?
2000 Protege ESComment
-
no, it's even easier than that. you just have to open the hood and the place where you cut is located directly under the air inlet. the black tray looking piece of plastic.Comment
-
Originally posted by SAprotege02 View Post
Daddy is VERY happy with this mod. I was a bit worried at first & I didn't have all the right tools but I got done it was worth it. Car does rev higher & quicker I notice it more in second gear then any where else third also. I did disconntion the neg battery for like 30 secs. No flashing lights no nothing. I did not remove the MAF screen because I have NO clue where it is & how to get it out. Might just have to wait to the next local club meet! Thanks everyone!
I LOVE IT! Got Zoom?
2000 Protege ESComment
-
Overview: How Air Intake Mods Affect HP Output
For those of you who are interested, I just updated this thread. Because of its length, I thought it a good idea to add an overview which summarizes the effects of the mods described here for those who might wish to carry them out on their own.
Most of you are aware that the crank or BHP of an engine is positively correlated with intake air density and negatively correlated with intake air temperature. Recalling that air density is defined as the weight of air for a given volume, and that the MAF sensor meters on air density, locating the air inlet in a high pressure area, reducing negative pressure in the intake duct and ensuring that the intake air temperature is at the ambient rather than above, have the effect of increasing intake air density. It's for these reasons that the intake mods previously described here have resulted in at least a moderate increase in power output and performance. However, there is an additional reason for the performance increase that may not be as evident.
We know that BHP = IHP - FHP, where FHP is the HP consumed by internal engine friction. But FHP has two components: mechanical friction between moving parts, especially piston motion in the cylinders, and fluid friction in the intake and exhaust systems including the flow through the valves and motion within the cylinders. It's this second type of friction, also known collectively as pumping losses, that concerns us here.
Anything that enables the downward movement of the piston on the intake stroke to more easily 'pull' the intake charge into the combustion chamber, such as a high pressure air inlet and reduced intake duct restrictions, results in a reduction in pumping losses and consequently a decrease in FHP.
In like manner, a freer-flowing exhaust system will reduce pumping losses (reducing the work required of the piston to expel the burnt gases on the exhaust stroke) and generate a similar effect. However, that's a topic for another thread.
To recapitulate, there are two reasons for any noted performance increase due to the modified OEM system described here: an increase in intake air density and a reduction in pumping losses.
Reference: Engineering Fundamentals of the Internal Combustion Engine, Second Edition, by Willard W. Pulkrabek; Chapter 11: Friction and Lubrication, pages 410-442.
Happy Motoring!02 DX Millenium Red - The Penultimate Driving Machine
MP3 Strut Tower Bar kit; Cusco Front Lower Arm Tie Bar
MSP Springs, Struts, Stabilizer Bars, Trailing Links, #3 Engine Mount
Kartboy Stabilizer Bar Bushings; Nyloil Shifter Bushings; Red Line MT-90 Gear Oil
MP3 Shifter, Knob and Aluminum Pedal Set
Suvlights HD Wiring Harness; Osram Night Breaker H4 Bulbs; Exide Edge AGM Battery
Summer: 5Zigen FN01R-C 16 x 7" Wheels; Yoko S.drive 205/45-16s
Winter: Enkei OR52 16 x 7" Wheels; Falken Ziex ZE-912 205/45-16s
Modified OEM Air Intake; Racing Beat Exhaust System; Techna-Fit SS Clutch Line
Denso SKJ16CR-L11 Extended Tip Spark Plugs; Magnecor Wires
Power Slot Front Brake Rotors; Techna-Fit SS Brake Lines; Hawk HPS Pads
Red Line Synthetic Engine Oil; C/S Aluminum Oil Cap
Cyberdyne Digital Gauges: Tach; Ambient Air Temp; VoltmeterComment
-
Wow good thing I kept all my stock pieces! I replaced the stock system with an aftermarket filter and tubing after discovering my flex tube had cracked (not so flexible after 100+k miles i guess) I think I'll round up my snorkel, bust out the dremmel n give this shot. :D
Only question I have is, since my flex tube is f***d would u suggest buying a oem replacement or would a smooth silicone tube be less restricting? I know the point of the flex is so it moves with the motor since it's mounted to the body, but I made a custom bracket(...actually my hubby did that part<3) to mount on the transmission harness bracket for my current aftermarket setup. Don't know how much difference a smooth surface would make vs ribbed, just always heard flex tube restricted air flow.
Gotta give kudos to Goldstar for this inspiring thread! Wish I had tomorrow off so I could get started, I'll let yall know how it goes
Thanx Againsigpic
Mod List:
*KYB GR2 Struts
*Modified stock intake
*K&N Performance air filter
*Stainless Header
*Custom Interior- hot pink / black carbon fiber wrap
*Urethane Filled Mounts (1 done so far)
*Alpine 600W Amp / Audiobahn 12" SubComment
-
In theory, a smooth internal bore might be slightly less restrictive than the OEM flex tube air hose but since I've never tried that mod I couldn't say for sure. As you point out, the flex tube is necessary to accomodate the relative movement between the engine and the chassis-mounted parts of the induction system but if you have a custom mount that accomplishes the same function, a smooth bore silicon tube should be just fine. It certainly couldn't hurt.
If you have any other questions, don't hesitate to ask.
zoomzoom chick, thank you very much for your kind words about this thread, and I'm glad that you found it useful. Please do let us know about how the mod works for you as I know many of us will be interested in your evaluation.
Happy Motoring!02 DX Millenium Red - The Penultimate Driving Machine
MP3 Strut Tower Bar kit; Cusco Front Lower Arm Tie Bar
MSP Springs, Struts, Stabilizer Bars, Trailing Links, #3 Engine Mount
Kartboy Stabilizer Bar Bushings; Nyloil Shifter Bushings; Red Line MT-90 Gear Oil
MP3 Shifter, Knob and Aluminum Pedal Set
Suvlights HD Wiring Harness; Osram Night Breaker H4 Bulbs; Exide Edge AGM Battery
Summer: 5Zigen FN01R-C 16 x 7" Wheels; Yoko S.drive 205/45-16s
Winter: Enkei OR52 16 x 7" Wheels; Falken Ziex ZE-912 205/45-16s
Modified OEM Air Intake; Racing Beat Exhaust System; Techna-Fit SS Clutch Line
Denso SKJ16CR-L11 Extended Tip Spark Plugs; Magnecor Wires
Power Slot Front Brake Rotors; Techna-Fit SS Brake Lines; Hawk HPS Pads
Red Line Synthetic Engine Oil; C/S Aluminum Oil Cap
Cyberdyne Digital Gauges: Tach; Ambient Air Temp; VoltmeterComment
-
Originally posted by rwindleyme02 View PostOriginally posted by nicodeemus View PostHi guys. First of all, I'd like to preface my comments with the following 'disclaimer'. I'm not an engineer of any sort, I'm just a dumb sheet metal worker (of 32+ years). My opinions are based on that knowledge and experience.Originally posted by zoomzoom chick View Post
While I agree with rwindleyme02's description of the purpose for the MAF screen (I was thinking of posting a more primitive explanation myself), what he didn't tell you is that the screen in fact reduces the "free area" maybe as much as 50%. This is typical of all perforated screens. So, while it evens out the flow of air it also reduces it. Removing it is a compromise, less accurate readings for the sensor but increased air volume to the engine.
So, nicodeemus, your bug screen is also a restriction of air (sorry guy, good idea for keeping out bugs, but kind of a 2 steps forward, 1 step back thing).
zoomzoom chick, the flex tube also causes some air restriction due to turbulence. A smooth wall would be better.
Here are a few basics in regard to air flow from the dumb guy;
1) Flex or corrugated surfaces are bad, smooth surfaces are good.
2) Sharp corners and angles are bad, long radius turns are better.
3) Many bends and turns are bad, straighter paths are good.
That's all I got.
P.S. I plan on doing some of these mods too.Comment
-
rwindleyme 02: Thanx for the info one the screen, I was probly gonna leave that mod out simply because the benefit to my daily driving (though I try to make it as exciting as possible) didn't outweigh the cost of replacing the MAF if somethin did go wrong
nicodeemus: I thought about doin the same thing with some random mesh I found in the garage yesterday. I also encounter lot of "buggies" where im at so it made sense at first but it did seem like it would defeat the purpose alittle, after all our grill should do most of the bug catching
Kev aka "dumb guy" lol thanx for the tip, I've decided on silicone tubing.
After taking another look at my setup, can anyone tell me if that resevoir-like piece that would sit next to the radiator serves a purpose? I havent had time to install anything yet but i didnt see the point except i guess for water drainage?
Im off tomorrow so I plan on getting started first thing!
sigpic
Mod List:
*KYB GR2 Struts
*Modified stock intake
*K&N Performance air filter
*Stainless Header
*Custom Interior- hot pink / black carbon fiber wrap
*Urethane Filled Mounts (1 done so far)
*Alpine 600W Amp / Audiobahn 12" SubComment
-
I thought this topic had been adequately covered and laid to rest but since it has surfaced again I'll return to it.
rwindleyme02's claim that removal of the MAF screen produces no positive results (reduction in negative air pressure) appeared in post #130, page 9 of this thread. I responded to it in my post #131 in which I pointed out the existence of data indicating that removal of the screen did in fact reduce negative pressure in the intake air duct after the MAF sensor (in one instance by 19%), and has the potential to increase power output at maximum rpm. The data comes from two references that I relisted in my post #131 and earlier listed in post #2 where I first discussed removal of the MAF sensor screen. I also pointed out that I would not recommend removal of the MAF sensor screen without the existence of data showing a positive effect. I don't recommend mods just because I "think" they're beneficial.
I agreed with rwindleyme02 that the function of the screen is to reduce turbulent flow through the MAF sensor, not to serve a protective function, which I had already pointed out in post #2. Since the intake air must turn after flowing through the air filter element to reach the MAF sensor, the potential for an increase in turbulent flow, and consequently less accurate metering, exists. However, I, along with Edgar and Bell, believe that the increase in turbulent flow is trumped by the reduction in negative air pressure in the intake duct. However much the increase in turbulent flow over the more desirable laminar flow, and whatever its effects on MAF sensor metering, as I've stated before I've never noticed any negative effects due to this factor. Since I felt screen removal gave a noticeable increase in performance in my car, I recommended that others should try it. Whether or not you do so is strictly a personal choice.
And yes, any screen, or mesh, placed anywhere in the induction system will result in an increased pressure drop, just the opposite of what we're trying to achieve here.
Happy Motoring!Last edited by goldstar; 03-28-2010, 03:06 PM.02 DX Millenium Red - The Penultimate Driving Machine
MP3 Strut Tower Bar kit; Cusco Front Lower Arm Tie Bar
MSP Springs, Struts, Stabilizer Bars, Trailing Links, #3 Engine Mount
Kartboy Stabilizer Bar Bushings; Nyloil Shifter Bushings; Red Line MT-90 Gear Oil
MP3 Shifter, Knob and Aluminum Pedal Set
Suvlights HD Wiring Harness; Osram Night Breaker H4 Bulbs; Exide Edge AGM Battery
Summer: 5Zigen FN01R-C 16 x 7" Wheels; Yoko S.drive 205/45-16s
Winter: Enkei OR52 16 x 7" Wheels; Falken Ziex ZE-912 205/45-16s
Modified OEM Air Intake; Racing Beat Exhaust System; Techna-Fit SS Clutch Line
Denso SKJ16CR-L11 Extended Tip Spark Plugs; Magnecor Wires
Power Slot Front Brake Rotors; Techna-Fit SS Brake Lines; Hawk HPS Pads
Red Line Synthetic Engine Oil; C/S Aluminum Oil Cap
Cyberdyne Digital Gauges: Tach; Ambient Air Temp; VoltmeterComment
-
If you mean the reservoir that hangs down alongside the right side of the radiator as you face it from the front of the car, the FSM refers to it as a resonance chamber. In fact, it's a Helmholtz resonator. Some claim, including some members of this Forum, that it functions to enhance and maintain low speed torque, and since you're going back to the OEM system, you should leave it in place. According to this view, removing it will give a decrease in performance at the low end.Originally posted by zoomzoom chick View Post
However, Helmholtz resonators that affect low speed torque (cylinder filling at low rpms) are usually located between the air box and the TB. Those devices located before the air box, as in our case, usually are there to perform a silencing function for the intake air and have nothing to do with restoring low speed torque. This is the position taken by Julian Edgar and I refer you to his commentary on the subject in AutoSpeed, titled "Those funny things tee'd into intakes...". You can access it at:

I used to think that our Helmholtz resonators were employed to increase low speed torque but after reading Edgar's blog, now I'm not so sure.
I've never removed mine so I don't know what effect its absence would produce. Note however, that it is not inline with the induction system but rather in parallel to it so it shouldn't act as a restriction to air flow. Therefore, to be on the safe side, I would advise leaving it in place and not worry about it unless you care to experiment to determine its effect. If so, be sure to let us know your conclusions.
Good luck with your project.
Happy Motoring!Last edited by goldstar; 03-28-2010, 03:01 PM.02 DX Millenium Red - The Penultimate Driving Machine
MP3 Strut Tower Bar kit; Cusco Front Lower Arm Tie Bar
MSP Springs, Struts, Stabilizer Bars, Trailing Links, #3 Engine Mount
Kartboy Stabilizer Bar Bushings; Nyloil Shifter Bushings; Red Line MT-90 Gear Oil
MP3 Shifter, Knob and Aluminum Pedal Set
Suvlights HD Wiring Harness; Osram Night Breaker H4 Bulbs; Exide Edge AGM Battery
Summer: 5Zigen FN01R-C 16 x 7" Wheels; Yoko S.drive 205/45-16s
Winter: Enkei OR52 16 x 7" Wheels; Falken Ziex ZE-912 205/45-16s
Modified OEM Air Intake; Racing Beat Exhaust System; Techna-Fit SS Clutch Line
Denso SKJ16CR-L11 Extended Tip Spark Plugs; Magnecor Wires
Power Slot Front Brake Rotors; Techna-Fit SS Brake Lines; Hawk HPS Pads
Red Line Synthetic Engine Oil; C/S Aluminum Oil Cap
Cyberdyne Digital Gauges: Tach; Ambient Air Temp; VoltmeterComment
-
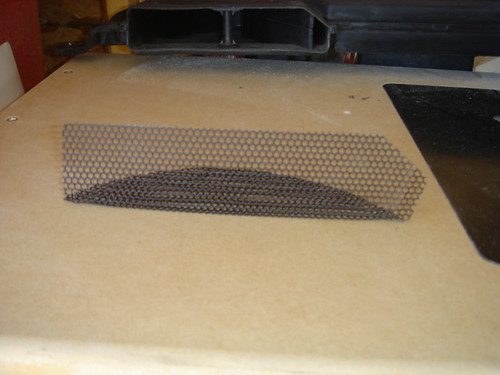
I completed mod #1 on Sunday, cutting the opening in the horizontal grill support, and so far thats gone well. I haven't had time to play with anything else, been busy helping my husband put a couple of his cars together n get them moved cuz the "city ordinance" is givin us crap for having too many cars (They're just jealous!) Hopefully the craziness will be over soon n I can get back to play time! Here's a pic of my progress so far...
I had trouble gettin the image to show up so it can also be viewed at
http://www.myspace.com/jennscott626 under my pics - car mods
Goldstar, both views seem to make sense...maby both are right...either way my curiosity tends to overrule my sense so Im gonna try it without first, worst case I have to stick it back on. I will let yall know what happens
I've also decided to paint my airbox n a few other various under-the-hood components pink. Although this will result in absolutely zero gain in my cars performance (duh!) it will look friggin awsome!!! This might delay my project alittle but I'll keep postin my progress
sigpic
Although this will result in absolutely zero gain in my cars performance (duh!) it will look friggin awsome!!! This might delay my project alittle but I'll keep postin my progress
sigpic
Mod List:
*KYB GR2 Struts
*Modified stock intake
*K&N Performance air filter
*Stainless Header
*Custom Interior- hot pink / black carbon fiber wrap
*Urethane Filled Mounts (1 done so far)
*Alpine 600W Amp / Audiobahn 12" SubComment
Comment